githubEdit

Setting up a ServiceNow Data Source for Ticket Concierge

Introduction

The purpose of this document is to enable Aisera employees to set up Ticket Concierge (TC) on ServiceNow.

Ticket Concierge functions in the following way:

  1. First, it picks up a Ticket in ServiceNow ticketing system. It’s important to discuss different conditions under which the Ticket needs to be picked up and analyzed by Aisera Ticket Concierge.

  2. Once the Aisera software identifies an Intent and finds the Fulfillment, it sends a push notification to the end user that consists of the pre-amble (Conversation Message) + Fulfillment, which could be a KB article or flow.

Limitations - Ticket Concierge does not support:

  1. The Email channel for fulfillment

This does not mean that users can not report Tickets via email. For instance, an end user can submit a request via email in ServiceNow and receive fulfillment on Slack. This limitation means that the Aisera platform does not send TC fulfillment answers via email at this time. If the end user does not engage with any other channels and prefers to receive fulfillment via email, we recommend that you have TC post a comment on the ServiceNow ticket, which then triggers an email notification from ServiceNow to the user.

  1. RAG, LLM, Public KB

  2. Universal Bot

Prerequisites

To setup Integration:

  1. Navigate to Settings → Integrations in the Aisera Administration application (Aisera Admin UI).

  2. Click + New Integration.

  3. Select ServiceNow and enter:

    1. Name

    2. End point. The end point could be taken from the ticketing URL:

    c. Check the Public field, if it's not already checked.

    d. Click OK.

Integration with ServiceNow
Setup the Data Source

Set up the Data Source for Ticket and User Learning.

  1. In the Aisera Admin UI, navigate to Settings → Data Sources.

  2. Click + New Data Source.

  3. Select ServiceNow.

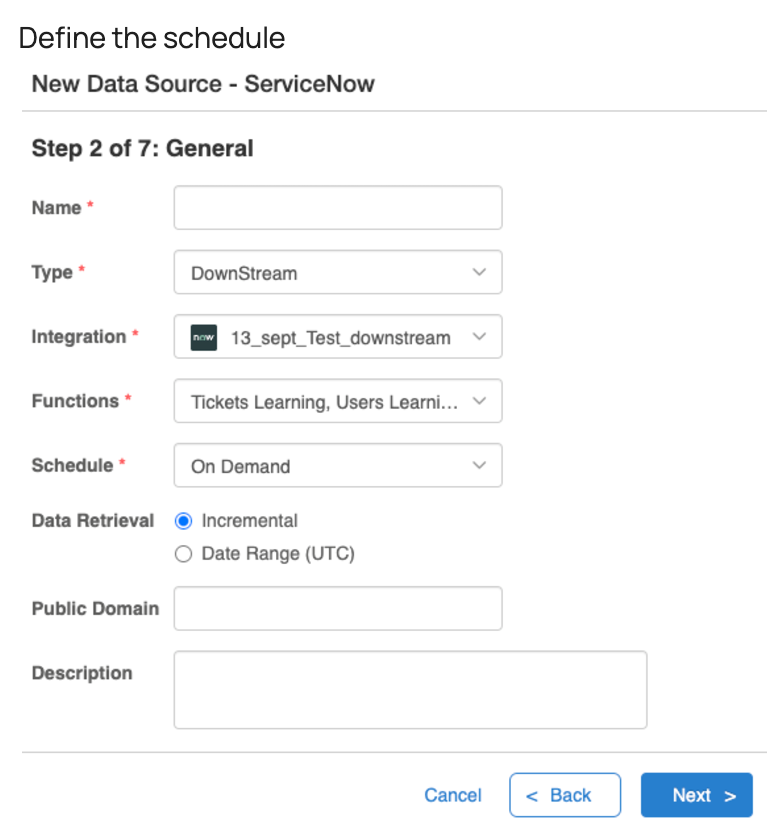
  4. Under General:

    1. Add Name

    2. Select the previously created integration from the drop-down list for Integrations.

    3. Select Downstream.

    4. Functions: select Ticket Learning, User Learning

    5. Define the schedule:

f. Click Next.

g. Step 3 of 7: skip the Configuration variables and click Next.

h. Step 4 of 7: skip the Templates variables and click Next.

i. Step 5 of 7: skip the Ingestion Configuration variables and click Next.

j. Step 6 of 7: skip the Summary variables and click Next.

k. Step 7 of 7: skip the Overrides variables and click Next.

  1. Attach the Data Source to an existing AiseraGPT App and run the job for user and ticket learning.

NOTE: You may already have Intents setup on the application. However, if none is set up, create, activate, and retain an Intent before you continue.

Finish Aisera App setup

While the job is running on the Data Source, let’s review a few items:

  1. Go to the App and enable the Ticketing System as an SOR. This will generate a token.

  1. Scroll down to Conversation messages and click to view the list

  1. From the list, search for Ticket Concierge and modify the copy as it will be viewed by end users

Modify Conversation Messages

Data Type Creation

  1. Select Settings > Data Type in the Aisera Admin UI to define a new Data Type. A Data Type is a custom Aisera entity that you can create to use as a Data Source for Events and Triggers.

    New Data Type
  2. Configure the Data Type to receive events from external systems and map the incoming payload to its fields - "$" represents the incoming payload.

Choose the New Field button on the Data Type Details window to add fields that you want to use with Events and Triggers.

New Data Type Field

Select the New Custom Field button to add fields associated with Aisera internal events.

Default data types are available for internal events, such as AuditEvent.

The payload from the ServiceNow System Script that gets attached on Retrieved Update Sets looks like this and should be modeled in a Data Type accordingly,

NOTE: When you are creating a Data Type and its fields to match the above payload, there are some important concepts to keep in mind:

  • There are two different kinds of payload attributes, that you need to be map to the Data Type fields:

    • Intent Extraction attributes: when creating Data Type fields, you have to selectively add the attributes, to carry useful information for intent extraction from the ticket, such as, Subject, Description, Status, and Category. Exclude fields that are not useful for intent extraction, such as, createdAt and updatedAt.

    • Ticket Auditing attributes: There are three attributes that are always required for auditing and, these attributes need to be always created on the datatype for internal auditing purposes, of the user request in RequestDetails page. They are : Ticket Id, Ticket Reporter Email, Ticket URI.

  • Create fields for both Intent Extraction Attributes, and Ticket Auditing Attributes from the payload (JSON object sent from the ServiceNow Ticketing system). The payload should look similar to the following:

Ticket Creation Payload from ServiceNow

Modeling the Attributes

As described above, the Data Types Details window should look like this following screenshot, after you have added Fields based on the Ticket Creation Payload from ServiceNow.

Data Type Fields Created Based on Ticket Payload from ServiceNow

There are two points to keep in mind when modeling attributes:

  • The Field Name (as shown on left side) should be the name that you want the Aisera Gen AI platform to use and display. It can be whatever you want, since this is used internally.

  • The External Field (as shown on right side) is the exact mapping of the attribute from the ServiceNow payload (the JSON object that gets sent when a ticket is created).

Note: Important: The $ symbol holds the entire JSON payload, so when you are creating the external field, be extra careful because it is case-sensitive. This also has to match the exact name and exact level in the JSON payload, and it can not have any extra spaces, anywhere. Example:

For the Ticket Reporter Email Address: its a level two attribute in the JSON file, so it is mapped as: $.reporter.emailAddress from the payload.

Upload External System Script or Create Webhook

Navigate to System Update Sets → Retrieve Update Sets and upload the .xml file. - Linkarrow-up-right (Ask your Aisera team and ServiceNow Admins to download and upload to ServiceNow).

ServiceNow Upload of Retrieved Update Set

If you need to update the authorization from Basic to OAuth, navigate to Script Action after you have the value (see steps above) and search for aisera. Then go to line 69 and 70 and comment one of these out.

Update Authorization
Script Action

Upload and Publish the Update Set.

Data Source Update for Event Handler

  1. Edit your ServiceNow Data Source so that it includes your new Data Type.

    1. Make sure your Data Source includes the Event Trigger, UserLearning, and TicketLearning functions.

    2. Select your new Data Type (that you created above).

    This will normalize incoming data for processing from multiple sources.

Edit the Data Source
  1. Select Schedule as On Demand, and leave the defaults for the rest of the parameters.

  2. Click OK.

Run System Ingestion Jobs

After editing the Data Source, navigate to Settings > System Jobs.

  1. After editing the Data Source, navigate to Settings > System Jobs.

  2. Make sure you are in the Generic Jobs tab.

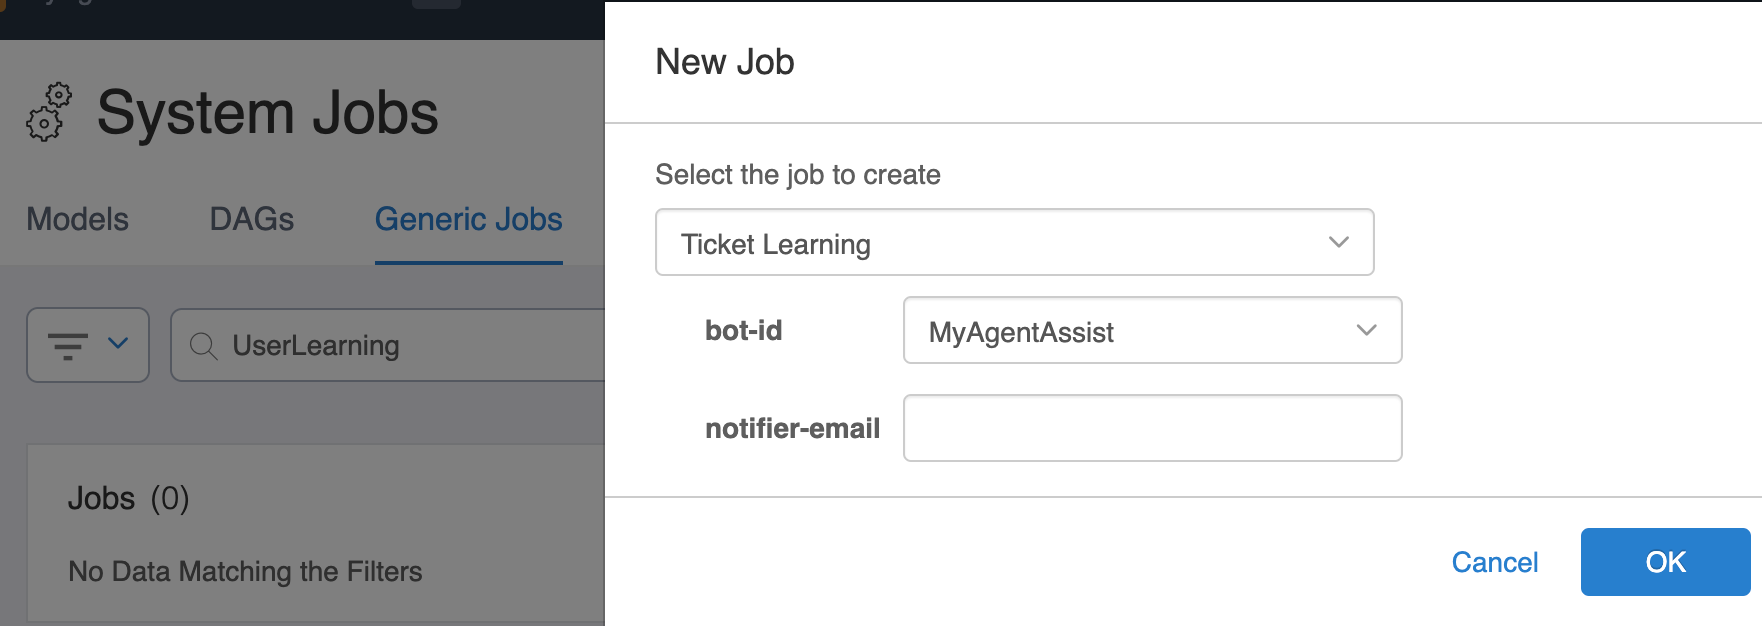
  3. Select + New Job.

  4. Choose Ticket Learning.

  5. Repeat the steps above to run the User Learning job.

  6. Proceed to the next steps when the jobs complete without any errors.

Run Ticket Learning Job
  1. Navigate back to the Data Source Details page to see the updated results.

Results of Data Ingestion Jobs in Data Source Details Window
  1. Copy the values of the Endpoint URL and App Key from the Data Source Details page. Examples Endpoint URL : https://xxx.api.aws-00x-us-west-x.aisera.cloud/event-gateway/events App Key: H4sIAAAAAABAAAEwAM//TJNL/Dm+UBzsPeB49Ep56P89xFIJjvJttOOdEb05N6v0kkJS71ynwUWSVnYnCCqvWtJqLDAAABA=

Modify System Properties List in ServiceNow

Navigate back to your ServiceNow Instance and make the following changes in the system properties list.

  1. Navigate to the URL of your ServiceNow instance.

  2. Append '/sys_properties_list.do' arrow-up-rightto the URL, to navigate to the System Properties List instructions.

  3. Search for the endpoint and app key parameters and enter the Aisera endpoint URL and App Key values from the Data Source Details window (in the previous section).

  4. Add the Aisera Endpoint URL.

ServiceNow System Properties Page

  1. Add the App Key.

Add the App Key (Token)

Create an Aisera Event Trigger/Handler

  1. Navigate to AI Automation > Event Studio

  2. Choose + New Event Trigger in the upper right corner.

  3. Select the Ticket Concierge option in the New Event Trigger window.

New Event Trigger
  1. Create a Name for the Event Trigger. Example: Snow TC Event Handler 1.0

  2. Set the Event Handler Type to Ticket Concierge.

  3. Choose the ServiceNow Data Source for the Ticket Concierge data source. Example: Snow Event Studio DS for Ticket Concierge.

  4. Set the Status field to Active.

Choose Data Type, Event Type, and Triggering Condition

On the Second page (2 of 3):

  1. Set the Data Type to the ServiceNow Data Type that you created in previous steps.

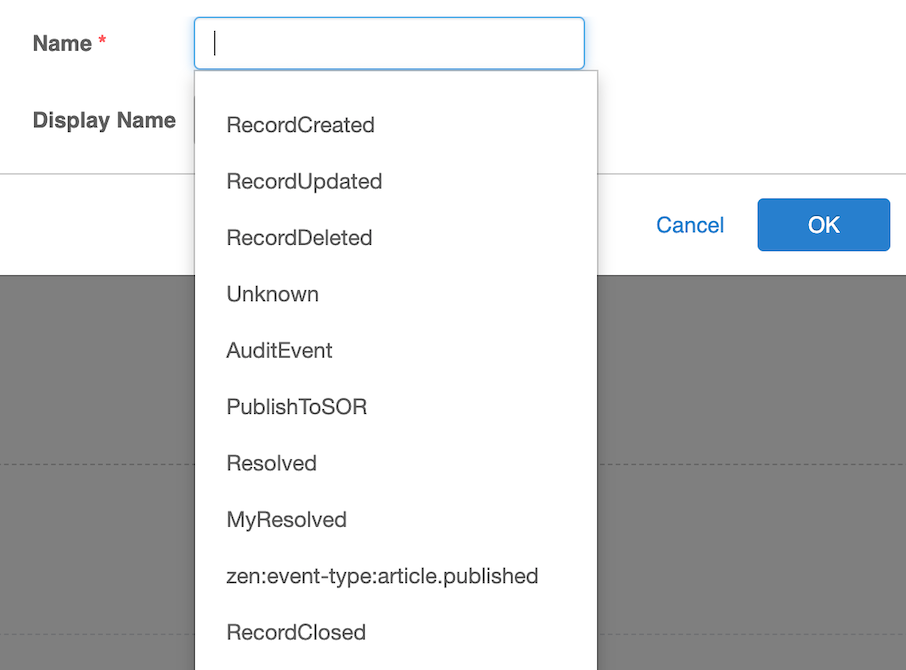
  2. Choose RecordCreated as the Event Type.

  3. Select the AI Ticket Fields. These fields correspond to the Ticket Auditing Attributes. They are used to Audit the Ticket Request, for fields on the Request Details page, and for Analytic pages. Choose the appropriate options from the drop-down lists. The drop-down lists are populated from the fields in your Data Type. You can select triggering conditions on the fields to restrict processing of certain tickets, like example when Priority field is set to High, or status set to New etc.

Tie Trigger to Workflow

On the final page (3 of 3) you can tie the Event Trigger to the TC Workflow:

  1. Choose a Pre-handling Workflow that you want to trigger as soon as a Ticket is created. The Pre-handling Workflow is only invoked only when Ticket Reporter Email address is missing from the payload. This can happen due for multiple reasons. for example, the email might not be sent due to security concerns. If so, you have to make a call to the external ticketing system to retrieve the reporter's email address.

Setting Pre-handling Flow

You can perform additional pre-processing operations on the Ticket, because the Prehandling Flow is a Workflow, but do not forget to set the userEmail output variable in the Workflow, because this is used by the Aisera Gen AI platform process the Request.

Navigate to AI Automation > AI Studio if you want to edit Workflow Input Variables.

Modify Workflow in AI Studio

The Aisera platform expects an output variable called userEmail, of type String to be set by the pre-handling workflow, and this is what gets consumed by the transaction and is set as the Ticket Reporter Email address and consumed in the TC Request Pipeline while finding the fulfillment and delivering the fulfillment result back to the userEmail.

Output Variables
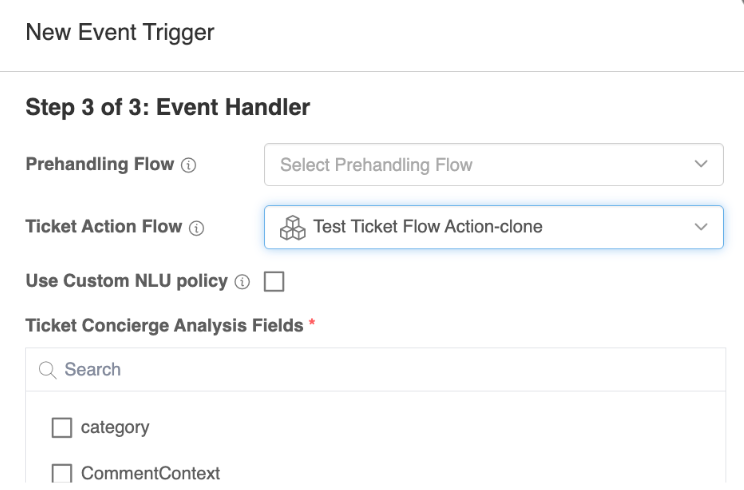
  1. Choose the Workflow for the Ticket Action Flow - that gets triggered when a Ticket is created. The Ticket Action Flow can be setup as part of the Event handler creation process, in the final page of Event Handler creation, and is invoked when a fullfillment is found, for the ticket request, and the intuition behind using this flow, is that if we want to take an action on the ticket, once a fullfillment is found, i.e. update some fields of the ticket in the external ticketing system.

Choose Ticket Action Flow
  1. As part of the Ticket Action Flow, the Input Variables that are exposed to the Workflow, are as follows:

Input and Output Variables in AI Workflow Studio

Examples of Ticket Action Flow:

The Aisera platform fills the variables in at runtime, and executes this workflow in runtime (when a Ticket is created), and uses these variables to craft your Ticket Action workflow. An example use case for this workflow would be:

  1. Update Ticket Status as resolved, after fulfillment is found by TC.

  2. Write a comment on the Ticket, with the fulfillment found in a Knowledge Base article.

Other useful Events: HandleConversationEvent (System Workflow)

When a User gives positive feedback, on the fulfillment provided by the TC pipeline, the HandleConversationEvent workflow is invoked. EscalationFeedback (System Workflow)

When a User gives negative feedback, on the fullfillment provided by the TC pipeline, the EscalationFeedback workflow is invoked.

  1. Select your Ticket Concierge Analysis Fields (The list shows fields are the mapped to your Ticket Intent Extraction Attributes). The checklist menu is also populated from the fields in your Data Type. The example in the screenshot above only uses Subject and Description for Intent extraction, but you should choose the fields that work best with your use case.

  2. Click OK to create the Event Handler.

Fine Tuning Fulfillments (NLU Policy)

On this third page of the Event Trigger/Handler setup (3 of 3) you have the ability to set the priority for the fulfillment engines, with the additional ability of removing some fulfillment engines, if they are not needed as part of your use case.

Fine-tuning Fulfillments

Channel Setup

Select the channels where you want the responses to be delivered

  1. Navigate to Settings > AiseraGPT.

  2. Choose the bot that you want to use for Ticket Concierge.

Choose a Channel or Create a New One
  1. Click the + Add Channel button to associated a channel with your bot.

  2. Choose a channel from the list of channels that have been added for your tenant instance.

  3. Click OK.

Notification Settings

  1. Go back to your Bot Details window and click the pencil icon to modify the bot settings.

  2. In the General tab, set the Notification preferences for All Channels.

Notification Preferences for Channels

Testing

Before you begin testing:

  • Make sure that you have run the User and Ticket Learning jobs (as described above), and that hey have finished running.

  • Make sure you have an Intent to use for testing.

To test your Ticket Concierge:

  1. Navigate to the SOR and create a new Ticket with a User selected and a Request in the Title and Body of the ticket.

  2. Click Submit.

  3. Open the webchat, enter the same User profile and you should receive an answer from the bot.

Analytics

Ticket Concierge collects the same analytics as other channels. You can review User Requests on the Requests page by filtering the channel.

Last updated

Was this helpful?